Showing posts with label tutorial. Show all posts

Friday, August 22, 2014

DIY Watermelon Coasters


So if you follow me on Instagram you will know I've been working on these bad boys for awhile. Summer is busy and I have to say I actually keep making more of these instead of writing up the post.  Finally I said to myself "self just start writing". "Get something on paper". Yes call it old school, I like a pen and paper.  
There are a few things that I really like  about this project: one, the wool felt is lovely and easy to work with, two, you can really mix up the colors. Watermelons range from soft pink, not quite ripe flesh to deep sweet pink, super ripe.  Three, you can hand sew or machine sew these coasters.   Which means it can be a travel project. 
I struggled with the shape in the beginning.  My inspiration for this project came from Molly's apple coasters on purlbee.com and this piece of fabric that I fell in love with two summers ago:  

I wanted to do watermelon coasters because the shapes can be different and these are a whimsical coaster for a summer BBQ.  So I've experimented with a few shapes, colors, threads and techniques.  You choose what you want to do. See what you like best.  So choose your design and your color palette.  Once you choose your palette you will need 1 piece of felt per color.
My palette: the greens are lime, kelly, olive
pinks: baby pink, bright pink, pink, fuschia
white: ecru, white

Supplies: 
1 18" square felt per color
hand sewing needle- I used an embroidery needle between sizes 5 and 10
dmç cotton perle 8 -  greens #700 and #906 (lime green),  ecru, deep pink #718, bubble gum pink #603, baby pink #818
For the seeds: I used DMC embroidery floss in black #310, it's a 6 ply but I only used 3 ply.
fabric scissors
pinking shears
1.  Your design is chosen; half circle, full circle, cut slice.  Cut out your pieces of felt. 
The following directions are for circle and half circle. I used the bottom of a large jar that had a 5" diameter.  This was for my green piece and the largest size, from here I sized down about 1/2" for the white then the pink.   If you have Adobe Illustrator or a compass, you can make your circles quite easily.   I created a template in Illustrator.


I played around with the design of it.  In the top photo you will see I experimented with strips of pinks to add some dimension.  I also experimented with shades of green thread to  add watermelon skin texture.  I ultimately settled on the circle and half circle, 3 layers and keeping the flesh a solid piece of pink felt.


2. Sew the seeds. Place one piece of pink felt on top of white felt and using the black thread, either 3 ply of DMC floss or the perle DMC  do a simple running stitch starting at the back side (the white).  With a disappearing tracing pen I drew little v's to follow as a shape for the seeds.  You can also machine stitch the seeds.


 For the machine stitch I used a zig zig in black or chocolate brown on top.  Remember to sew the seeds before putting the last layer, green, on. This way you won't see the underside of the seeds.

3.Lay the pink and white section on the green.  Do you want a really ripe melon? Then choose your dark green.  Pin the layers together and if you want to make a bite into the piece of melon now is the time to bring out the pinking shears.  

Hand sew pink edges with your choice of pink Perle thread and then do the same with the white.  You can sew a green Perle thread around the edges, this would just be a topstitch. 

Time to have a watermelon cocktail!

PS these are machine washable cold, but please line dry.
And be sure to check out my post on etsyny website on cacti color palettes for the fall!

Have a great weekend!
Tracey

Tuesday, October 1, 2013

How to make: Throw pillow with zipper closure


If you are a beginner sewer one of the easiest ways to spice up your living quarters is to change up the pillows.  Zippers are usually scary to most sewers, don't be scared.  They are actually quite doable.  In the past month I have made pillows for our newly finished back yard, my husband's birthday and my friend Kayte's new couch.  For Andy's birthday the pillows were made with some fabrics he found at a sample sale for about $10 each piece.  They were already pre-cut to the perfect size for an 18" square pillow.

For Andy's pillows I used a natural color canvas for the back.
For this pillow tutorial I used 2 different fabrics.


Fold over the raw edge of one back piece 1/2" and steam with iron


                                        Lay face up on top of zipper over the zipper tape


Attach zipper foot and sew


Take second back piece and fold over 2 ½” and press,  sew a ¾” seam allowance close to folded edge


Lay on top of piece 1 overlapping by ¾”Sew with back side up, be sure zipper foot is running along zipper teeth (see pic)


Back side complete!

Unzip zipper (you are unzippering this because we will be sewing all 4 sides of the pillow case) and lay front piece face to face with back piece

Pin together and sew a 1/2" seam allowance around all sides

Steam with iron


Trim corners at an angle so you can get nice pointy corners when you turn it back out.


Push corners out with a point turner, I like the bamboo kind

Iron and steam, 

Slip pillow into case. 


Finished!

Monday, June 3, 2013

Tutorial: Father's Day Pocket Square / Hankie

Since my last post, I delivered a baby! Yes, little Harper Scarlett came 2 weeks early.  Since my husband is now a father and father's day is coming up, I thought it only appropriate to post an easy pocket square for you to sew for the dad in your life.  Pocket squares are making a come back, influenced by the show Mad Men, seen in GQ magazine as an "indispensable tool" and now J.Crew is carrying a line of pocket squares.  Pocket squares are a great way to dress up a suit, add a dash of color and a fun print.

This doesn't have to be just for dads, my friend Kayte loves these pocket squares for herself.  She uses these as a hankie all the time especially in the New York City humid summers.   If you are a beginning sewer this is a great project for you.

The key ingredient for this pocket square is you want very soft cotton.  I used Liberty of London which is called a Lawn Fabric.  The count is high, which means there are a lot of very fine threads per inch making it softer (think of high count bedding sheets).  RobertKaufman, a popular fabric manufacturer, also makes a lawn fabric in solid colors.

Materials:
1/2 yard of fabric ( you will be using a 12" square but stores usually require you buy a minimum)
matching cotton machine thread
size 8 needle
fine pins

Step 1:
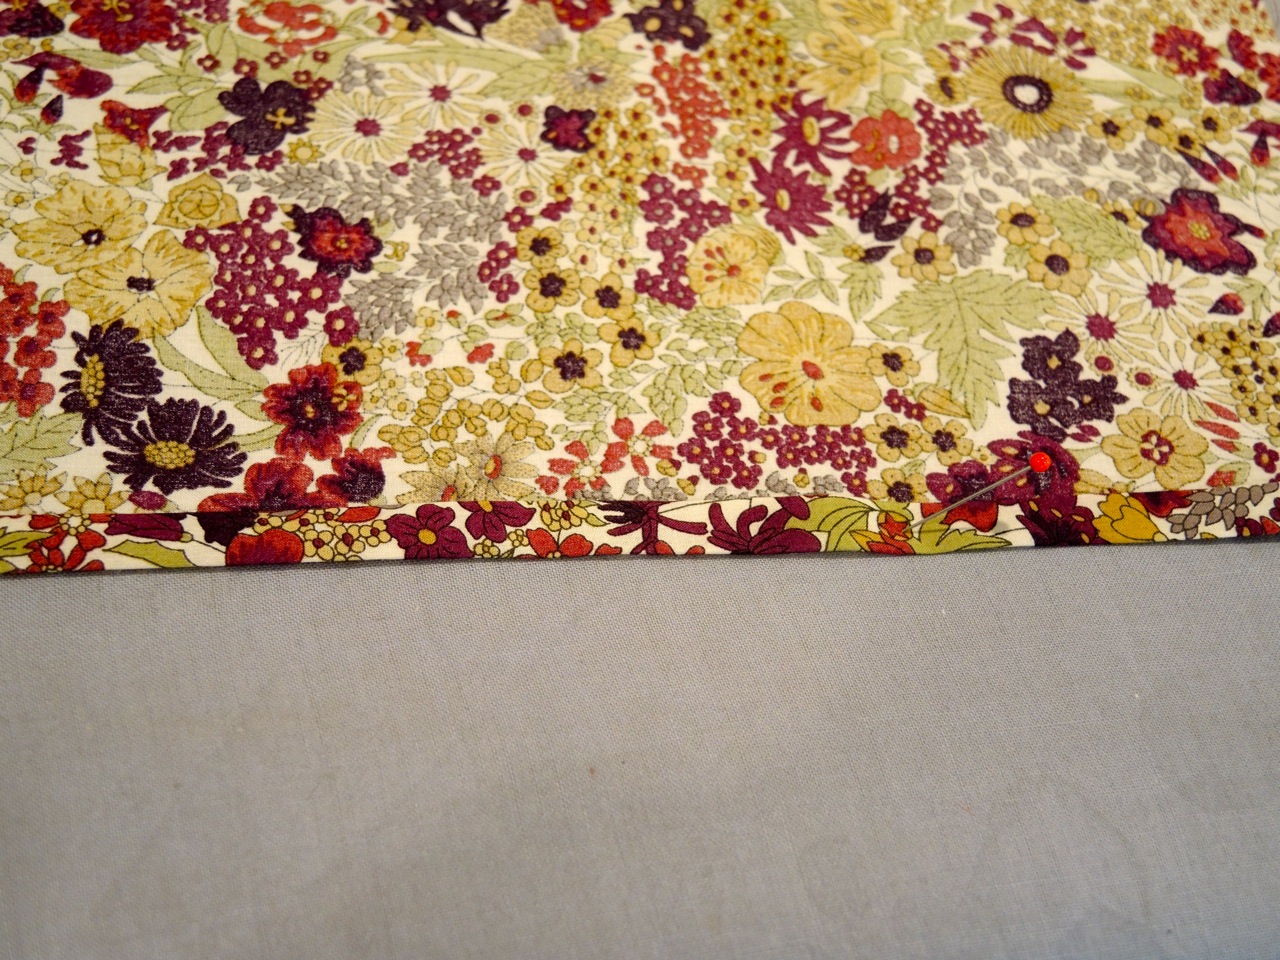
Cut out a 12" square and iron.  Fold over 1/4" twice on 2 opposite ends.  I pin down, iron, then secure the pins into the fabric.


Step 2: where the raw edge meets the now folded edged, fold in the corner at an angle, this way your corners will be nice and neat and have no fabric overhang. Repeat step one, fold over 1/4" seam allowance twice.

Step 2

Step 3: all fabric is pinned down. Because this is such a skinny seam allowance I do pin it parallel to the seam. Normally in the classes I teach I tell my students pins should be perpendicular so the pins can be pulled out while you sew or the needle can jump the pins.

Step 3


Step 4: Sew on the inside fold. This ends up being about 1/4" seam allowance.  If you are using the Liberty of London or the Robert Kaufman Lawn fabrics use a size 8 needle since it is finer.  Start your sewing somewhere in the middle, not on a corner.  This reduces the risk of the fabric getting bunched up on a corner or pushed down into the machine.


Step 5: when you reach a corner, sew to the end and back stitch to the beginning of the fold.  Leave the needle in, pick presser foot up and pivot.  Sew down the next seam. Repeat on all corners.

Step 5


Step 6 all finished, iron and steam and gift!


 If you aren't a sewer or just don't have the time to shop for fabric and make the gift, you can purchase one in my etsy shop. 
Click here to see my Liberty Pocket Squares. 

If you decide to sew this let me know how you do or if you have any questions.

Thanks!

Monday, October 8, 2012

Tutorial: Making a Cafe Curtain


Ok for you newbie sewers out there you may be asking "What is a cafe curtain?" Or "I can never make a curtain". Basically it is a panel and it is super easy!  It can be a full panel covering the total window or a half panel, covering the lower half of the window. Just imagine a cafe in Paris and sitting at a table you can peer over the curtain to watch outside or put your head down and read a book without everyone watching you.  A single panel is good for small windows. You can push it open by sliding it slightly or using a complementary tieback.

We have a door in our bedroom that goes out to the back yard. The door has a small window so we didn't want anything fancy for covering it up. We also wanted it to match the shade we got for our windows, a warm latte color.  A cafe curtain was the perfect solution.

Instructions:
1. Measure your window and add 2" to the height and width
2.  Fold over 3/8" seam allowance on all 4 sides, steam.

3. On the bottom and sides fold in another 3/8", steam and sew an edge stitch on the inside fold.


 4. Be sure to steam after sewing!

5. For the top loop I overlocked my raw edge since I have a serger. But don't worry, if you don't have a serger just fold over once and steam as in step 2.

At the corners fold in a diagonal then pin down and steam. Normally I don't put pins like this, but the seam allowance is so tiny I do in this case.


6.  Fold over 2" , pin and steam
 

7. I find it helpful to pin the end openings so they don't shift when you are sewing the edge stitch on the fold. See below.


8. Finished! And steam! And hang!

Since this is a door with no window frame, Andy found curtain rods that are magnetic at Home Depot! I believe Target also carries them.


Monday, August 13, 2012

Tutorial - How to sew a button

Stop paying people to sew a button for you and do it yourself. DIY.

Check out my guest blog on the Etsy NY Team blog today: How to sew a button.


Homer and I wish you a Happy Monday and have a great week!

Homer sitting in Andy's chair while we work on our blog post this morning. 


Tracey